How to use Git for version control
When more than one developer works on a project it is easy for files to get out of sync, particularly when two or more developers are editing the same file. Git is a system for version control, which allows developers to manage different versions of their files.
Git doesn't think of your code as a collection of files and directories, but as a series of changes applied on top of each other. Git stores changes in commits made by contributors (developers). A commit can have as many changes as a contributor wants (called hunks) in many different files.
Being a distributed system means rather than having one copy of everyone's work, each contributor has a copy on their own machines called the local repository. When a developer has made a change that they want to publish to other developers, then they group their changes into one or several commits and push them to the remote repository. In Beautiful Canoe we use GitLab to store all of our remote repositories. When other developers are ready to see the changes that other contributors have published, they pull the remote changes into their local repository.
Installing Git
Installing Git on Debian-based Linux distributions
sudo apt update
sudo apt install git
Installing Git on a Mac
Using Homebrew:
brew install git
Install git on Windows
Download Git from Git for Windows and run the installer.
Accessing repositories locally
In order to access a repository on GitLab you need to have the correct permission to first view it. You can see the projects that you have access to on your projects dashboard.
You will also need to have configured Git locally:
git config --global user.name YOUR_NAME
git config --global user.email YOUR_EMAIL_ADDESS
Once you have configured Git, you should be able to clone a remote repository on the command line:
git clone git@gitlab.com:beautifulcanoe/peopleops/docs.beautifulcanoe.com.git
Generate an SSH key for GitLab
In a shell, run the ssh-keygen tool, similarly to the example below.
When you are asked where to store the key, accept the default location (~/.ssh/id_rsa), and when you are asked to enter a passphrase, twice, just press the Enter key on your keyboard (i.e. enter a blank passphrase).
For your email address, use the same address you used to create your GitLab account, presumably your Aston account:
$ ssh-keygen -t rsa -C "USERNAME@aston.ac.uk"
Generating public/private rsa key pair.
Enter file in which to save the key (/home/$USER/.ssh/id_rsa):
Enter passphrase (empty for no passphrase):
Enter same passphrase again:
Your identification has been saved in /home/$USER/.ssh/id_rsa.
Your public key has been saved in /home/$USER/.ssh/id_rsa.pub.
The key fingerprint is:
SHA256:...W+c USERNAME@aston.ac.uk
The key's randomart image is:
+---[RSA 2048]----+
...
+----[SHA256]-----+
$
Go to the keys section of your GitLab settings, and add the new key.
You will find it in the file ~/.ssh/id_rsa.pub.
Some basic Git commands
Git is a complex tool, and it can be used in many different ways. In this document we describe the most common workflow that we use in Beautiful Canoe.
Firstly, go to your repository and look through the list of issues. Find an issue to work on -- usually one marked ~"To Do", meaning that it should be resolved in the current sprint. Remember that any issue marked ~Doing will already have work in progress in an MR.
Open the issue and click the Create merge request button. This will create a new branch in the remote repository. A branch is a list of commits, or a history of commits. In the remote repository there will be one (or more) protected branches, which contain the changes that have successfully been through code review. In this repository the only protected branch is main, but some repositories will also have special branches called develop and release/v0.1, etc.
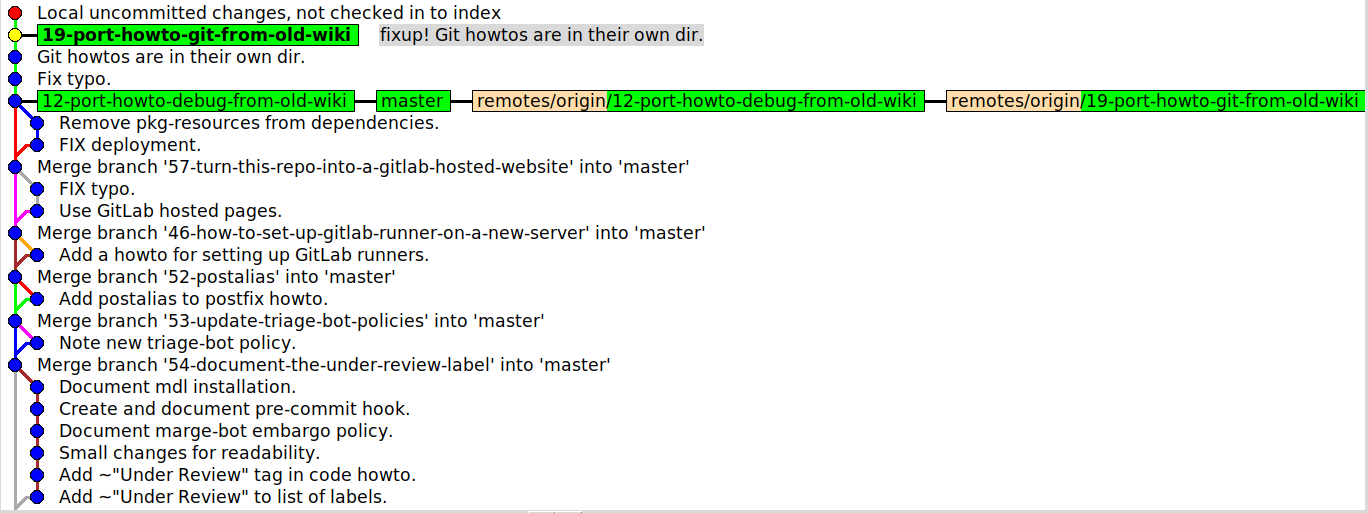
For example, this work is (currently) in a branch called 19-port-howto-git-from-old-wiki which is intended to resolve Issue #19. Note that in the diagram below the main branch contains a number of merge commits, where work from other branches has been reviewed and merged into main.
Once you have created a merge request, go to the root directory in your repository on the command line and run:
git fetch
which will fetch the new branch from GitLab, then checkout your new branch:
$ git checkout 19-port-howto-git-from-old-wiki
Switched to a new branch '19-port-howto-git-from-old-wiki'
You can add a new file to the repository:
git add FILENAME
Remove a file:
git rm FILENAME
or move a file:
git mv OLD_FILENAME NEW_FILENAME
and when you are ready, commit your changes:
git commit
This will open up a text editor and allow you to write a description of your changes. Try to commit your changes often. A good commit should be a reasonably small set of changes (in terms of lines of code), which should all be related to one another.
Writing good commit messages
The seven rules of a great Git commit message
- Separate subject from body with a blank line
- Limit the subject line to 50 characters
- Capitalize the subject line
- Do not end the subject line with a period
- Use the imperative mood in the subject line
- Wrap the body at 72 characters
- Use the body to explain what and why vs. how
Source: How to Write a Git Commit Message.
Publishing your changes to other developers
You should regularly make your changes available on GitLab, in your feature branch:
git push origin 19-port-howto-git-from-old-wiki
This protects you in case anything happens to your hard drive, and it makes your changes available in case you need to use a different laptop or development environment.
Once you have made all the commits needed to complete the work identified in the issue, go to the MR page on GitLab and remove the Draft marker from the MR by clicking the Mark as ready button. Assign someone (usually the CTO) to review your work, and label both the MR and issue as ~"Under Review".
This process is described in more detail in the How to get code merged document.
Using git hooks
When you checkout a repository, a directory called .git/hooks/ will be included automatically in your repo.
That directory contains example scripts that git can run automatically when you perform common operations, such as a commit, push, pull, etc.
For example:
$ ls .git/hooks
applypatch-msg.sample      pre-applypatch.sample      pre-rebase.sample
commit-msg.sample          pre-commit.sample          pre-receive.sample
fsmonitor-watchman.sample  prepare-commit-msg.sample  update.sample
post-update.sample         pre-push.sample
In order to make use of these scripts, you can remove the .sample extension from the filename, and make sure that the file is executable (chmod +x FILENAME).
The sample files give you some ideas for operations to run, but they are not very specific to Beautiful Canoe projects - so, mostly these will not be very useful to you!
A more example would be a script to check that your unit tests pass before you push code to GitLab.
The idea here is to cancel the git push if the tests fail.
The example below is a pre-push hook from a PHP / Laravel project.
It checks that the composer.json file is valid, then it runs the project unit tests and a simple lint (PHP Code Sniffer) for errors in the code.
If any of these tests fail, the git push will be cancelled:
$ cat .git/hooks/pre-push
#/bin/bash

git version
composer validate --no-check-all --strict
./vendor/bin/phpunit
./vendor/bin/phpcs
Most Beautiful Canoe repositories have custom Git hooks stored in a directory called hooks/.
Look out for a shell script in bin/ which installs these hooks for you, as symbolic links.