How to setup a Unity Project
Unity is used to create 2D / 3D games or simulations. C# is the main language that is used by this platform, but Unity also gives the user a UI to visually design features of the game like world design.
Installation and Set up
Choose your version
If a project already exists, check the version by navigating to ProjectSettings folder and then view the ProjectVersion.txt file which contains the version. If a new project is being created, find out which version should be used for the project. If the version needs to be the latest, use this link: https://unity3d.com/get-unity/download otherwise, use this link for the archive of older versions: https://unity3d.com/get-unity/download/archive.
C# IDE
For C#, an IDE is needed, use your preferred IDE or Visual Studio is a good choice which can be downloaded here: https://visualstudio.microsoft.com/vs/
Git
Once your project has been created or the existing project needs version control, create a new repo and add the following gitignore to your project, ensure to change the folder structure if needed:
# This .gitignore file should be placed at the root of your Unity project directory
#
# Get latest from https://github.com/github/gitignore/blob/master/Unity.gitignore
#
src/[Ll]ibrary/
src/[Tt]emp/
src/[Oo]bj/
src/[Bb]uild/
src/[Bb]uilds/
src/[Ll]ogs/
src/[Mm]emoryCaptures/
# Never ignore Asset meta data
!/[Aa]ssets/**/*.meta
# Uncomment this line if you wish to ignore the asset store tools plugin
# /[Aa]ssets/AssetStoreTools*
# TextMesh Pro files
src/[Aa]ssets/TextMesh*Pro/
# Autogenerated Jetbrains Rider plugin
src/[Aa]ssets/Plugins/Editor/JetBrains*
# Visual Studio cache directory
.vs/
# Gradle cache directory
.gradle/
# Autogenerated VS/MD/Consulo solution and project files
ExportedObj/
.consulo/
*.csproj
*.unityproj
*.sln
*.suo
*.tmp
*.user
*.userprefs
*.pidb
*.booproj
*.svd
*.pdb
*.mdb
*.opendb
*.VC.db
# Unity3D generated meta files
*.pidb.meta
*.pdb.meta
*.mdb.meta
# Unity3D generated file on crash reports
sysinfo.txt
# Builds
*.apk
*.unitypackage
# Crashlytics generated file
crashlytics-build.properties
# OS generated files
.DS_Store
.DS_Store?
._*
.Spotlight-V100
.Trashes
ehthumbs.db
Thumbs.db
Only Assets and Project Settings should be in version control as the other folders are generated from them. Learn more at this link: https://learn.unity.com/tutorial/project-architecture-unity-project-folder-structure
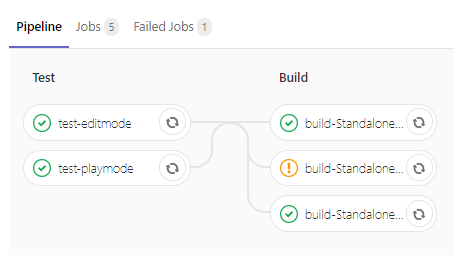
CI Pipeline
A Docker image is used for this process which has Unity installed. Note that Unity pipelines tend to be slow, so it is a good idea to set up a Unity Cache Server.
Files needed
.gitlab-ci.yml:
image: gableroux/unity3d:2017.2.0f1
stages:
- test
- build
variables:
  BUILD_NAME: (Project Name)
.unity_before_script: &unity_before_script
  before_script:
  - chmod +x ./ci/before_script.sh && ./ci/before_script.sh
.test: &test
  stage: test
  <<: *unity_before_script
  script:
  - chmod +x ./ci/test.sh && ./ci/test.sh
  artifacts:
    name: "$CI_JOB_NAME-$CI_COMMIT_REF_NAME-$TEST_PLATFORM-results"
    when: always
    paths:
    - $(pwd)/$TEST_PLATFORM-results.xml
test-editmode:
  <<: *test
  variables:
    TEST_PLATFORM: editmode
test-playmode:
  <<: *test
  variables:
    TEST_PLATFORM: playmode
.build: &build
  stage: build
  <<: *unity_before_script
  script:
  - chmod +x ./ci/build.sh && ./ci/build.sh
  artifacts:
    paths:
    - ./src/Builds/
build-StandaloneLinux64:
  <<: *build
  variables:
    BUILD_TARGET: StandaloneLinux64
build-StandaloneOSX:
  <<: *build
  variables:
    BUILD_TARGET: StandaloneOSX
  allow_failure: true
build-StandaloneWindows64:
  <<: *build
  variables:
    BUILD_TARGET: StandaloneWindows64
Build Script: https://gitlab.com/gableroux/unity3d-gitlab-ci-example/blob/master/Assets/Scripts/Editor/BuildCommand.cs
before_script.sh:
#!/usr/bin/env bash
set -e
set -x
mkdir -p /root/.cache/unity3d
mkdir -p /root/.local/share/unity3d/Unity/
set +x
echo 'Writing $UNITY_LICENSE to license file /root/.local/share/unity3d/Unity/Unity_lic.ulf'
cp $UNITY_LICENSE /root/.local/share/unity3d/Unity/Unity_lic.ulf
test.sh - For the “projectPath” argument change “/src” to where the project is on GitLab (e.g. if in GitLab the project is in the root folder, remove the “/src”, if it is under a folder called “Game” then change “/src” to “/Game”):
#!/usr/bin/env bash
set -x
echo "Testing for $TEST_PLATFORM"
touch $(pwd)/$TEST_PLATFORM-results.xml
${UNITY_EXECUTABLE:-xvfb-run --auto-servernum --server-args='-screen 0 640x480x24' /opt/Unity/Editor/Unity} \
  -projectPath $(pwd)/src \
  -runTests \
  -testPlatform $TEST_PLATFORM \
  -testResults $(pwd)/$TEST_PLATFORM-results.xml \
  -logFile \
  -batchmode
UNITY_EXIT_CODE=$?
if [ $UNITY_EXIT_CODE -eq 0 ]; then
  echo "Run succeeded, no failures occurred";
elif [ $UNITY_EXIT_CODE -eq 2 ]; then
  echo "Run succeeded, some tests failed";
elif [ $UNITY_EXIT_CODE -eq 3 ]; then
  echo "Run failure (other failure)";
else
  echo "Unexpected exit code $UNITY_EXIT_CODE";
fi
cat $(pwd)/$TEST_PLATFORM-results.xml | grep test-run | grep Passed
exit $UNITY_TEST_EXIT_CODE
build.sh - For the “projectPath” argument change “/src” to where the project is on GitLab (e.g. if in GitLab the project is in the root folder, remove the “/src”, if it is under a folder called “Game” then change “/src” to “/Game”):
#!/usr/bin/env bash
set -e
set -x
echo "Building for $BUILD_TARGET"
export BUILD_PATH=$(pwd)/src/Builds/$BUILD_TARGET/
mkdir -p $BUILD_PATH
${UNITY_EXECUTABLE:-xvfb-run --auto-servernum --server-args='-screen 0 640x480x24' /opt/Unity/Editor/Unity} \
  -projectPath $(pwd)/src \
  -quit \
  -batchmode \
  -buildTarget $BUILD_TARGET \
  -customBuildTarget $BUILD_TARGET \
  -customBuildName $BUILD_NAME \
  -customBuildPath $BUILD_PATH \
  -customBuildOptions AcceptExternalModificationsToPlayer \
  -executeMethod BuildCommand.PerformBuild \
  -logFile
UNITY_EXIT_CODE=$?
if [ $UNITY_EXIT_CODE -eq 0 ]; then
  echo "Run succeeded, no failures occurred";
elif [ $UNITY_EXIT_CODE -eq 2 ]; then
  echo "Run succeeded, some tests failed";
elif [ $UNITY_EXIT_CODE -eq 3 ]; then
  echo "Run failure (other failure)";
else
  echo "Unexpected exit code $UNITY_EXIT_CODE";
fi
ls -la $BUILD_PATH
ls -R ./
[ -n "$(ls -A $BUILD_PATH)" ] # fail job if build folder is empty
Initial Setup
- Copy .gitlab-ci.yml and paste it into the root of the project (where the .gitignore file is).
- Edit .gitlab-ci.yml by changing the image to the Unity version that has been chosen (image: "gableroux/unity3d:2018.2.6f1") by finding the image in https://hub.docker.com/r/gableroux/unity3d
- Copy the Build Script to the project in the “/Assets/Scripts/Editor/” directory
- Add a folder in the root folder (where .gitlab-ci.yml is) called “ci” and inside this folder copy before_script.sh, test.sh and build.sh, make sure to edit these scripts accordingly.
Activate the Unity License
1. Install Docker locally
2. Copy your project to a folder docker can access (Copying is not needed but can be safer in case of accidental changes, this can also be a test environment that can be used locally)
3. Run the following script on docker:
UNITY_VERSION=2017.2.0f1 (Change this to your version)
docker run -it --rm \
-e "UNITY_USERNAME=(Unity Username)" \
-e "UNITY_PASSWORD=(Unity Password)" \
-e "TEST_PLATFORM=linux" \
-e "WORKDIR=/root/project" \
-v "$(pwd):/root/project" \
gableroux/unity3d:$UNITY_VERSION \
bash
4. Run the following in the docker created, in bash:
xvfb-run --auto-servernum --server-args='-screen 0 640x480x24' \
/opt/Unity/Editor/Unity \
-logFile /dev/stdout \
-batchmode \
-username "$UNITY_USERNAME" -password "$UNITY_PASSWORD"
5. Wait for a response which looks like the following:
LICENSE SYSTEM [2017723 8:6:38] Posting <?xml version="1.0" encoding="UTF-8"?><root><SystemInfo><IsoCode>en</IsoCode><UserName>[...]
6. Copy the xml content and save as a new file “unity3d.alf”
7. Open https://license.unity3d.com/manual and upload the file
8. Download the file and save as “Unity_lic.ulf”
9. Upload the file as an Environment variable in gitlab ci as UNITY_LICENSE
Once pushed this should trigger the job to start
Tests
There are two test types in Unity: Edit mode and Play mode. Edit mode tests are placed in the following folder: /Assets/Scripts/Editor/EditModeTests and Play mode tests are placed in: / Assets/Tests/ To create either a edit or play mode test, in Unity:
1. Go to the project navigation normally at the bottom of the screen.
2. navigate to which test mode’s folder that needs to be created.
3. Right-Click Create > Testing > (Mode Type) Test C# Script.
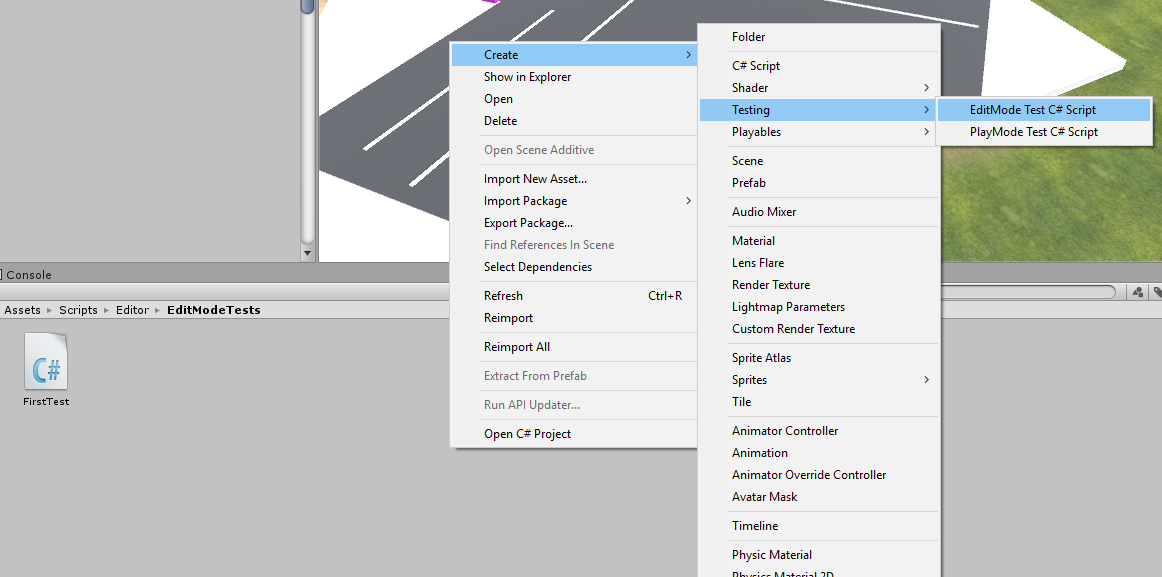
4. Click on the script to edit it
Please note that the CI pipeline will fail if there isn’t a script within either Play mode or Edit mode folders.
Running CI locally (Docker)
Docker can be used to run the project locally if needed (maybe need to test the CI without pushing to gitlab). Use the following command to open docker, -v is specifying the folder that you wish to be shared by your computer locally and with docker. Change this to which ever folder has the copied project or main project (Be careful if it’s the main project as docker can edit those files!):
docker run -it -v /VirtualBoxShared:/VirtualBoxShared gableroux/unity3d:2017.2.0f1
Run the following (this is similar to the before script):
mkdir -p /root/.cache/unity3d
mkdir -p /root/.local/share/unity3d/Unity/
cp /VirtualBoxShared/Unity_lic.ulf /root/.local/share/unity3d/Unity/
Run any command that is needed.