How to set up a new GitLab repository
To start a new GitLab repository, go to the beautifulcanoe/projects page and click on the New project button, near the top of the page.
Your project name and slug should be short and descriptive (just the name of the project is fine).
It is a good idea to add a short project description.
Your new project should be marked private and you should check the Initialize repository with a README box (unless you are forking an existing repository).
Next you should be taken to the project page.
At the top-right of the page you will see a button marked Clone, use this to find the URL of the project, then you can checkout the repository on the command line, like this:
git clone git@gitlab.com:beautifulcanoe/projects/<PROJECT-SLUG>.git
Mirroring and forking code from other repositories
Occasionally, we need to re-purpose code from an existing repository from another group, or from a client. This might mean mirroring a repository from GitLab or GitHub, or it might mean forking a repository.
In the case of forking code, it is important to fork all existing tags and branches from the upstream repository (for example, it may be that the new develop branch should be a stable release branch, rather than main).
In this case, clone the upstream repository locally, and do this:
git remote rename origin upstream
git remote -vv # just to check
git remote add origin git@gitlab.com:beautifulcanoe/projects/<PROJECT-SLUG>.git
git remote -vv # just to check
for remote in `git branch -r | grep -v main `; do git checkout --track $remote ; done
git remote push --all origin
git remote push origin --tags
At this stage, you should check on GitLab that all branches and tags have been pushed, and then continue to set the repository up as if it were a new Beautiful Canoe repository.
Set standard merge request settings
We use merge requests to ensure that all code and documentation in Beautiful Canoe is reviewed, to ensure that automatic tests are run over all our code and to reduce the likelihood of bugs being merged into main.
Each repository should be set up in a standard way, to ensure that our merge process is standardised throughout the company.
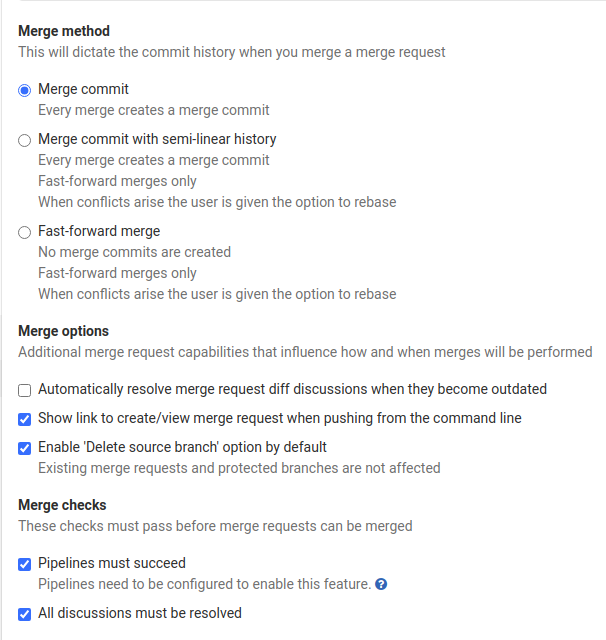
Go to Settings->General->Merge requests and set your repository up like this:

Note that you should only check Only allow merge requests to be merged if the pipeline succeeds if you have CI/CD pipelines set up.
Set default and protected branches
Next, we need to change some settings to ensure that we don't accidentally push to an important branch such as main without going through a merge request.
Firstly, you need to create a branch called develop.
On the command line, do this:
$ git branch  # Just to check that we are on the right branch
* main
$ git checkout -b develop
Switched to a new branch 'develop'
$ git push origin develop
Total 0 (delta 0), reused 0 (delta 0)
remote:
remote: To create a merge request for develop, visit:
remote:   https://gitlab.com/beautifulcanoe/projects/<PROJECT-SLUG>/merge_requests/new?merge_request%5Bsource_branch%5D=develop
remote:
To gitlab.com:beautifulcanoe/projects/<PROJECT-SLUG>.git
 * [new branch]      develop -> develop
Now, go to Settings->Repository in your project menu.
There are two settings we need to deal with here: default and protected branches.
At the top of the page, expand the Default Branch section, select develop and click on the Save changes button.
Further down, expand the Protected Branches section, and make develop and main selected branches, with only Maintainers allowed to push or merge.
You should also add release/* as a protected branch -- type release/* into the text box and click on Create wildcard release/*).
Branches named release will be deployed on live servers, and are versioned (i.e. release/1.0, release/1.1), so this will protect all the release branches.
Maintainers should be able to merge release/* branches and push to them.
These branches are slightly different from main and develop, which are created with the repository and never merged or deleted.
Instead, a new release/* branch will be created periodically, so it must be possible to push a new branch.
When you are finished, the protected branch settings should look something like this:

Configure pipelines
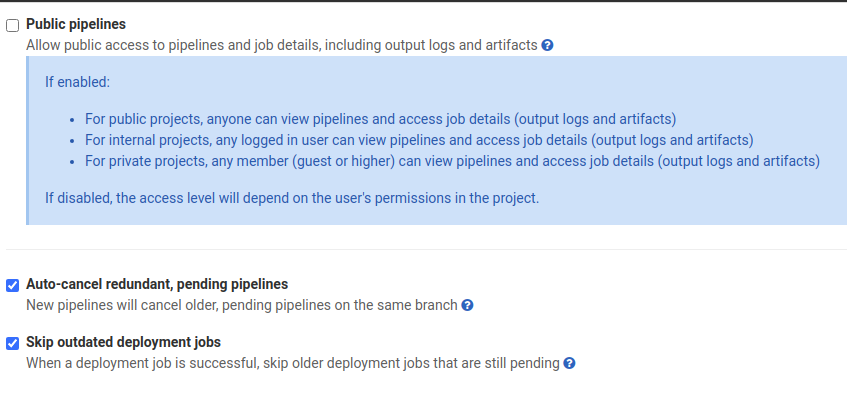
All new projects should be set to:
- Auto-cancel redundant pipelines, and
- Skip outdated deployments.
The second of these settings ensures that an older pipeline cannot deploy and over-write a newer pipeline.
If the repository is likely to be made public at any time, pipelines should not be made public. This is in case we forget to save a secret as a GitLab CI variable, and it leaks in the pipeline logs.

Image tag clean up policies
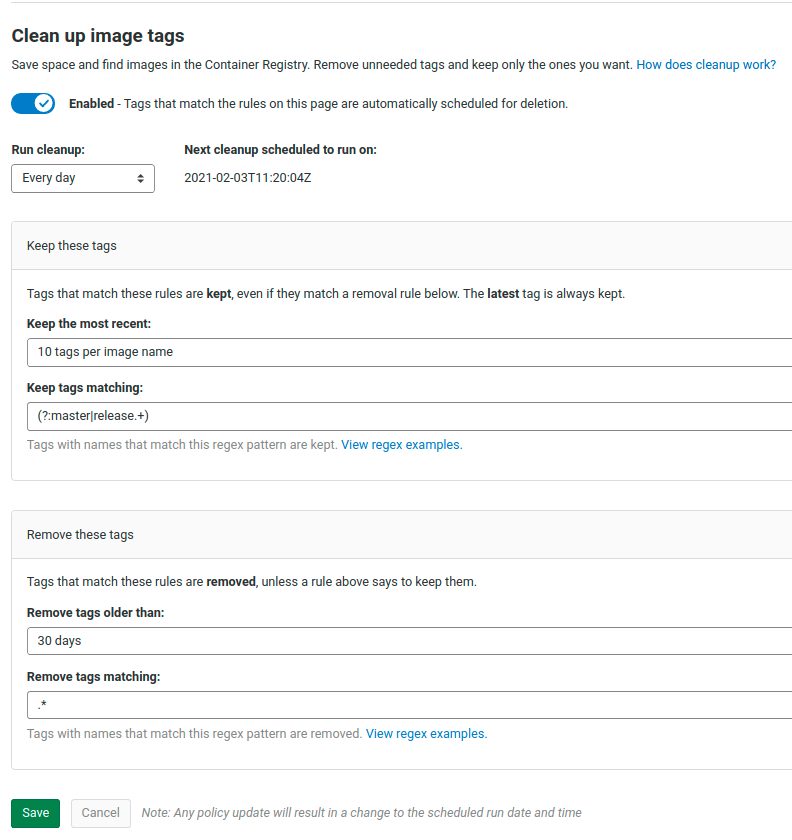
Under the Clean up image tags settings, we should run clean up every day, and keep:
- 10 tags per image name.
- All tags which start with
releaseormain.
We should remove:
- Tags older than 30 days.
- Tags matching
.*.

Add standard documentation
Every repository should start with a standard set of documents and, which should be formatted in Markdown and committed to version control. In general, we should not use wikis for project documentation, and we should not duplicate information in these howtos -- but it is a good idea to link to them!
As a minimum, each repository should contain:
README.md(orreadme.md) which should be a document that can be understood by a non-developer, and should describe:- what the project is intending to achieve,
- who the client is,
- who the (current and past) student developers are with their GitLab usernames,
- a link to the project Trello boards or other client-facing documentation, if there is any; and
- the URLs of the live and test deployments (if applicable).
CONTRIBUTING.md(orcontributing.md) which should be written specifically for developers, and should describe:- which programming languages and frameworks are used in the project, with their major/minor version numbers (e.g. php5.6, php7.2),
- project dependencies only if these are not listed in
composer.jsonor similar, - how to set up a development environment for the project (e.g. will the developer need Homestead, Vagrant, phpbrew, etc.) -- this should include links to how-tos in this repository, rather than duplicating information here,
- how to set up any database that the project needs,
- how to set up a standard IDE (such as PhpStorm or IntelliJ) for the project,
- how to run the unit tests, and which test framework was used; and
- how to set up any Git hooks that the repository provides.
As usual, you should add this new documentation by creating an issue and raising a merge request.
Add a standard .gitignore file
A .gitignore file should be placed in the root of the new repository, and checked into version control.
.gitignore tells Git which files in the repository should be ignored, to help developers avoid committing files that should not be in the repository (for example, backup files, auto-generated files, etc.).
The contents of .gitignore will depend on the technology stack (an commonly used IDEs) for the project, but to begin with a standard file from gitignore.io should be used.
Add standard issue and MR templates
We have a standard set of issues and MR templates that are stored in the .gitlab directory of our repositories.
Currently, GitLab has no way of creating a group-wide set of templates, so these need to be copied over to each new repository by hand, in an MR.
Add standard webhooks
We have two standard webhooks: one for our Congrats bot and one for our Welcome bot.
These should be set up in the webhooks section of the repository settings.
You will need to find the end-points to these services, which you can look up in any other company repository.
Next steps
Now you have an initial repository, you can set up the rest of your workflow: